Proxmox VE
Proxmox Introduction for VMware ESXi Users
Hands-on Workshop for Internal Engineers
Contents
- What is Proxmox VE
- Overview and Features
- Key Differences from VMware
- Lab Environment Setup
- 3-Node Cluster Configuration
- Ceph Storage Implementation
- Network Configuration
- Scenario 1: Basic Operations Demo
- WebUI Basic Operations
- VM Creation
- Live Migration (vMotion equivalent)
- Storage Migration
- Scenario 2: Failure Recovery Test
- Node Failure Simulation
- HA-based Automatic Recovery
- Cluster Recovery Process
- Scenario 3: Backup & Restore
- Using Proxmox Backup Server
- VM Backup Creation
- Restore Operations
- Comparison with VMware/Nutanix and Implementation Benefits
1. What is Proxmox VE
Proxmox Virtual Environment
Proxmox VE is an open-source virtualization platform that integrates KVM hypervisor and LXC containers. Based on Debian Linux, it can be easily managed through a web interface.
Version: Latest is 8.4 (Using 8.3.3 in this lab)
License: GNU AGPL, v3
Developer: Proxmox Server Solutions GmbH (Austria)
Key Features
- Integrated KVM and LXC Management
- Web-based Management Interface
- Cluster Management
- Software-defined Storage (Ceph, ZFS)
- Live Migration
- High Availability (HA) Features
- Integrated Backup Solution
- Firewall and SDN Features
Key Differences from VMware
Feature/Characteristic | Proxmox VE | VMware vSphere |
---|---|---|
License | Open Source (Paid support available) | Commercial License (Feature-based editions) |
Management Tools | WebUI + CLI | vCenter + CLI |
Virtualization Technology | KVM + LXC | ESXi (Proprietary) |
Container Support | Native (LXC) | vSphere Pods (Additional feature) |
Storage | Ceph, ZFS, NFS, etc. | VMFS, vSAN, etc. |
Implementation Cost | Low cost (Optional support) | High cost (Tiered licensing) |
Implementation Benefits
- Cost Reduction (License fees, management tools)
- Avoid Vendor Lock-in
- Simple Management (Single interface)
- Integrated Container and VM Management
- Community Support Access
2. Lab Environment Setup
Environment Overview
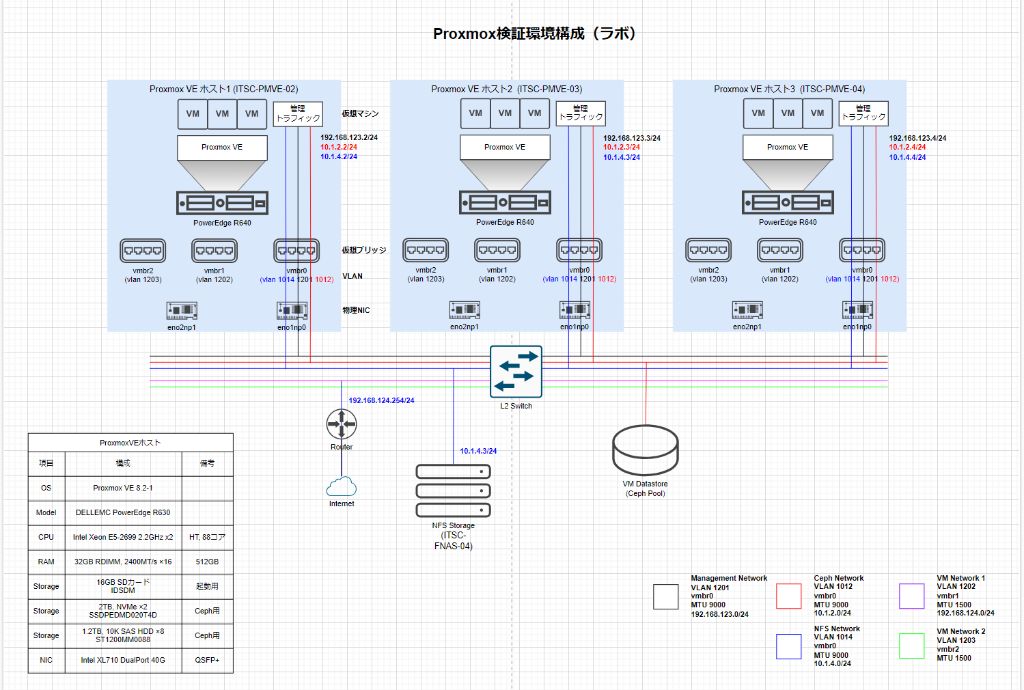
This lab consists of a Proxmox cluster with 3 servers and distributed storage using Ceph. This configuration enables testing of HA (High Availability) features and live migration capabilities.
Lab Environment Diagram

Hardware Configuration
Server Model: | DELL EMC PowerEdge R630 |
CPU: | Intel Xeon E5-2699 2.2GHz x2 (88 cores, with HT) |
Memory: | 32GB RDIMM / 246GB/s x16 / 512GB |
Storage 1: | 146GB SSD Local (OS) |
Storage 2: | 2TB NVMe x2 (for Ceph) |
Storage 3: | 1.2TB 10K SAS HDD x8 (for Ceph) |
Network: | Intel XL710 DualPort 40GbE QSFP+ |
OS: | Proxmox VE 8.3.3 (Debian based) |
Network Configuration
Ceph Network: | VLAN 1012 (10.1.2.0/24) |
NFS Network: | VLAN 1014 (10.1.4.0/24) |
Management Network: | VLAN 1201 (192.168.123.0/24) |
VM Network 1: | VLAN 1202 (192.168.124.0/24) |
VM Network 2: | VLAN 1203 |
Storage Configuration
Ceph Storage Cluster
- • Distributed storage across 3 nodes
- • Replication factor: 3 (triple data redundancy)
- • OSDs: Multiple per node
- • Pool configuration: VMs, containers, backup
- • Using RBD interface
Ceph is a distributed storage system that provides data redundancy and high availability. It offers functionality similar to VMware vSAN.
Additional Storage Resources
- • Local storage: For OS and temporary data
- • NFS storage: For virtual machine data
Ceph vs vSAN
While Ceph is similar to vSAN as a distributed storage solution, it’s open-source and has more flexible hardware requirements. However, improper configuration can affect performance.
3. Scenario 1: Basic Operations Demo
WebUI Basic Operations
Proxmox’s WebUI provides powerful management features with a simple interface. It’s intuitive even for VMware vSphere users.
- Left Panel: Datacenter, nodes, VM list
- Center Panel: Detailed information, settings
- Top Menu: Operation buttons, search, help
- Summary View: Resource usage
Note: No additional server like vCenter Server is required. Each node has management capabilities.
Proxmox VE WebUI Screen

(Screenshot of management interface after login)
VM Creation
Similar to VMware, you can create VMs and install operating systems through an intuitive interface.
Demo Content
- Click “Create VM” button
- Set VM name and OS type
- Select ISO image (Rocky Linux 9.2)
- Configure CPU and memory size
- Set up disk (on Ceph storage)
- Configure network (VLAN 1202)
- Review settings and create VM
Key Points
- VM wizard similar to VMware
- OS templates available
- Multiple storage types available
- Virtual hardware customization possible
- Easy cloning and templating
- Console access via VNC or SPICE
# VM creation via CLI is also possible (reference)
qm create 101 –name “rocky02” –memory 2048 –cores 1 –net0 virtio,bridge=vmbr1 \
–ide2 ITSC-FNAS-04:iso/Rocky-9.2-x86_64-minimal.iso,media=cdrom \
–scsihw virtio-scsi-pci –scsi0 CephPool:32,format=raw
Live Migration (Equivalent to vMotion)
Similar to VMware’s vMotion, you can move running VMs to another node without stopping them. This enables maintenance and load balancing.
Demo Steps
- Select running VM (test VM)
- Click migrate button
- Select destination node (ITSC-PMVE-02 → 03)
- Execute migration
- Display and explain progress
CLI Command (Reference)
qm migrate 101 ITSC-PMVE-03 –online
Migration Requirements
- Shared Storage: Ceph, NFS, iSCSI etc. required (Ceph in this environment)
- Network: High-speed internal network recommended (40GbE in this environment)
- CPU Compatibility: CPUs must be compatible within the cluster
- Memory Resources: Sufficient free memory required on destination
Difference from VMware
Proxmox’s live migration works similarly to vMotion but doesn’t require dedicated licenses or additional software. It’s included as a standard feature.
Storage Migration
You can also move VM disks to different storage. This is equivalent to VMware’s Storage vMotion.
Demo Steps
- Select “Hardware” tab of target VM
- Select disk to migrate
- Click “Move Storage” button
- Select destination storage (e.g., Ceph→NFS)
- Start migration and check progress
Online Migration
Disk migration is possible even while the VM is running. Block-level copying occurs in the background, with only differences synchronized at the end.
Use Cases for Storage Migration
- Storage performance optimization
- Migration to new storage
- Storage capacity redistribution
- Utilization of different storage types
# Disk migration command via CLI (reference)
qm move_disk 101 scsi0 nfs_nfs02 –format qcow2
Supported Storage Types
- Ceph RBD (distributed block storage)
- ZFS (local or shared)
- LVM (Logical Volume Manager)
- Directory (file storage)
- NFS, iSCSI, GlusterFS etc.
4. Scenario 2: Fault Tolerance Test
High Availability (HA) Overview
Proxmox’s High Availability (HA) feature is equivalent to VMware vSphere HA, automatically restarting VMs on another node when a node failure occurs.
Key Features of HA
- Automatic VM recovery on node failure
- Fencing capability (protection during split-brain)
- Resource distribution control (load balancing)
- HA settings configurable per VM
- Centralized management via cluster manager
HA Requirements
- Minimum 3-node cluster (for quorum)
- Shared storage (Ceph, NFS, etc.)
- Stable cluster network
- Sufficient resource capacity
Important Note
HA functionality does not eliminate downtime but minimizes it during failures. Complete zero-downtime operation requires application-level redundancy.
HA Configuration
Demo: HA Setup Steps
- Select target VM
- Click “More” button → Select “HA Management” menu
- Enter 1 for “Max. Restart” (number of restart attempts on same node)
- Enter 1 for “Max. Relocate” (number of attempts to start on different node)
- Set “Required State” to started (auto-start)
- Save settings
# HA configuration via CLI (reference)
ha-manager add vm:101
ha-manager set vm:101 –state started –max_restart 1 –max_relocate 1
Failure Response Demo
Verify how VMs automatically migrate to another node when a node failure occurs.
Test Scenario
- Test VM (HA enabled) running on ITSC-PMVE-02
- Verify VM status (ping response and web access)
- Execute restart on ITSC-PMVE-02 (failure simulation)
- HA manager detects node failure
- Restart target VM on another node (ITSC-PMVE-03 or 04)
- Verify VM recovery (ping response resumes)
- Check and explain downtime
Monitoring Items
- HA manager logs (/var/log/pve-ha-manager/)
- Cluster status (CLI: pvecm status)
- VM operation status (ping response time)
- HA recovery process duration
Important Points for Production
In production, it’s important to set priorities between VMs based on service importance to control startup order during resource constraints. Fencing configuration should also be considered for network partition protection.
Comparison with VMware vSphere HA
Feature | Proxmox HA | VMware vSphere HA |
---|---|---|
Basic Operation | Quorum-based cluster management | Primary/Secondary method |
Minimum Nodes | 3 nodes (recommended) | 2 nodes |
Fencing | Built-in (watchdog) | Built-in (APD/PDL handling) |
Resource Reservation | Manual planning | Automatic (admission control) |
Additional License | Not required (standard feature) | Required (Standard or higher) |
5. Scenario 3: Backup & Restore
Proxmox Backup Server Overview
Proxmox Backup Server (PBS) is a dedicated backup solution integrated with Proxmox VE, providing functionality equivalent to VMware vSphere Data Protection.
Proxmox Backup Server Features
- Enterprise Features: Incremental backup, deduplication, compression
- Consistency Guarantee: Crash-consistent backup of VMs
- Efficient Storage: Data chunk deduplication and compression
- Encryption: End-to-end encryption with AES-256-GCM
- Flexible Scheduling: Calendar-based schedule settings
- Authentication: Two-factor authentication, user management
Infrastructure Configuration
In this demo, we are using Proxmox Backup Server installed on a separate server. For production use, it is recommended to place the backup server in a physically separated environment.
Backup Demo
VM backup in Proxmox can be easily executed from the WebUI.
Manual Backup Procedure
- Select target VM
- Click “Backup” button
- Select backup storage (PBS)
- Choose mode (stop/snapshot)
- Select compression method
- Start backup
- Monitor progress
# Backup via CLI (reference)
vzdump 100 –storage PBS –compress zstd –mode snapshot
Scheduled Backup Configuration
- Select Datacenter → “Backup” tab
- Add schedule with “Add” button
- Select target VMs/CTs (All VMs etc.)
- Set schedule (daily, weekly etc.)
- Set time (recommended outside business hours)
- Set retention period (e.g., 14 days)
- Configure backup mode/compression
- Save and enable
Restore Demo
Restore from backup can also be performed through an intuitive interface.
Restore Procedure
- Select “Storage View” tab
- Select backup storage (PBS)
- Select target from backup file list
- Click “Restore” button
- Select target node
- New VM ID (same as original or new)
- Select target storage
- Execute restore and monitor progress
Restore Options
- Overwrite Same VM ID: Overwrite existing VM
- Create New VM: Restore with new ID
- Restore to Different Node: Restore to different node
- Restore to Specific Point: Select from multiple backups
Verification Restore
To verify backup contents without affecting production environment, restoring as a new VM to a different network is also effective.
Comparison with VMware Products
Feature | Proxmox Backup Server | VMware Products |
---|---|---|
Integration | Direct integration with Proxmox VE | Integration via vCenter (vSphere Data Protection) |
Incremental Backup | Standard support | Standard support |
Deduplication | Both source and target | Target side only (varies by product) |
Subscription | Optional (Community edition is free) | Required (VDP, vSphere etc.) |
Application Consistency | Via qemu-ga (partial support) | VSS support (Windows) |
6. Comprehensive Comparison and Conclusion
Comparison with VMware/Nutanix
Category | Proxmox VE | VMware vSphere | Nutanix AHV |
---|---|---|---|
License Model | Open Source (Support subscription available) | Commercial License (Essentials, Standard, Enterprise etc.) | Commercial License (Included in Nutanix platform) |
Initial Cost | Very Low | High (including vCenter Server) | Very High (HCI integrated) |
Operational Cost | Low (optional support) | High (ongoing licensing) | High (subscription) |
Ease of Management | Simple, integrated UI | Complex but feature-rich | Simple, one-click operations |
Enterprise Features | Common features included by default | Rich (available in higher editions) | Rich (standard equipment) |
Scalability | Optimal for medium scale | Supports large environments | Optimized for large environments |
Automation & Integration | API, CLI, Ansible support | PowerCLI, API, partner integration | REST API, Calm |
Community | Active open source community | Large enterprise & user community | Enterprise-driven community |
Proxmox Strengths
- Cost Efficiency: Significant license cost reduction with open source
- Single Management Interface: Unified management of VMs, containers, storage, and network
- Standard Features: Live migration, HA, backup as standard features
- Avoid Vendor Lock-in: Flexibility without vendor dependency
- Linux-based: High customization with complete Linux management node
- Container Integration: Seamless operation of VMs/containers
Considerations
- Technical Support: Enterprise-level support requires subscription
- Ecosystem: Fewer third-party integrations than VMware
- Operational Knowledge: More Linux/Ceph knowledge required
- Large Scale Environment: Less proven track record in very large environments than VMware
- Migration Cost: Effort required for migration from existing VMware environment
Conclusion: Proxmox Applicability
Through today’s demo, we confirmed:
- Proxmox VE provides standard features equivalent to VMware
- VM live migration, HA failover, backup etc. work without issues
- Intuitive management through WebUI
- Distributed storage with Ceph works effectively
Optimal Implementation Scenarios
- Environments requiring cost reduction
- Test/Development environments
- Small to medium-scale infrastructure
- Cases pursuing IT resource optimization
- Integrated management of container technology and VMs
- Strategy aiming for independence from specific vendors
Future Developments and Considerations
- Trial implementation in small production environments
- Parallel operation with existing VMware environment
- Verification of migration tools and processes
- Operations team skill development plan
- Support level consideration
- Detailed TCO (Total Cost of Ownership) analysis
Proxmox VE is worth considering as an alternative to VMware and Nutanix, especially for small to medium-scale environments and cases where cost efficiency is prioritized.
While being open source, it provides enterprise-level features, and with proper planning and implementation, significant cost reduction and operational efficiency can be expected.
Questions & Resources
Frequently Asked Questions
Q: How can I get support for Proxmox?
A: There is free support through the community forum and paid support subscription provided by Proxmox Server Solutions. The subscription includes access to the enterprise repository and ticket-based support.
Q: Is migration from VMware environment easy?
A: Some effort is required. Migration can be done using OVF export/import or Proxmox V2V (conversion) helper tools. We recommend creating a phased migration plan.
Q: How does Ceph storage performance compare to vSAN?
A: Properly configured Ceph performs well, but vSAN is generally more optimized. However, Ceph is more flexible and has less strict hardware requirements, giving it an advantage in terms of cost efficiency.
Q: What is the future outlook for Proxmox?
A: Since its initial release in 2008, development has been stable and the user base continues to grow. Being open source, it has the advantage of being less dependent on specific vendor business conditions. Continuous feature additions and security updates are being made.